This tutorial will show you how to extract sims from your game for sharing with others or for personal use. You will need two programs for this process: Body shop (which comes with The Sims 2) and
SimPE.
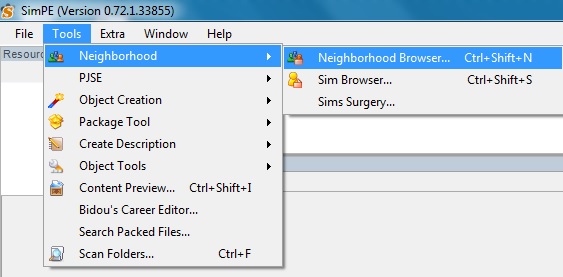
First you will need to open up the package file of the neighborhood where your sim resides with SimPE. The easiest way to do this is with the neighborhood browser in SimPE. So first, start up SimPE and wait for it to load. Once it has finished loading (which can take a while) click on "Tools" in the top menu bar, then "Neighborhood," then "Neighborhood Browser."
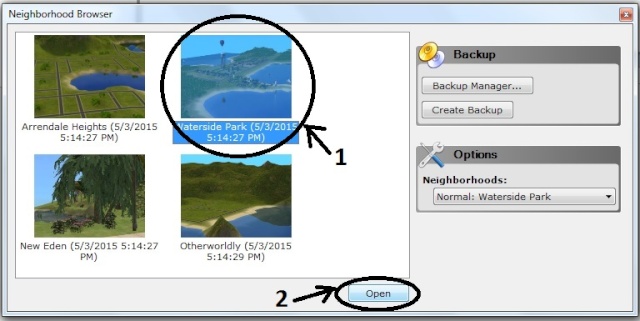
A window will pop up showing you all the neighborhoods in your game. Click on the picture of the neighborhood your sim resides in and then click "Open."
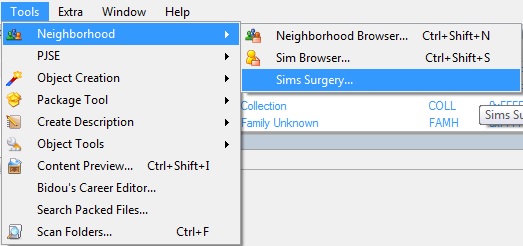
This will load all of the data about your neighborhood and all of the sims that live in it, so you may have to wait a few moments for it to load. Once the neighborhood file loads, then again you need to go to the top menu bar, choose "Tools" and then "Neighborhood," but this time go to "Sim Surgery." Don't worry, we aren't going to be doing surgery on our sims in this tutorial, but this is where the exporting option is located.
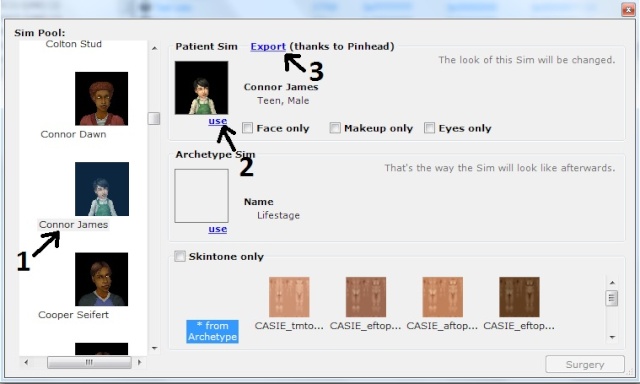
A window will pop up. On the left hand side is a list of all the sims that live in your hood (townies and NPCs included) with their names and pictures arranged in alphabetical order. Scroll down until you find the sim that you want. Don't be alarmed if your sim's picture shows them at a younger age than they are in your game, like in my example below. I'm extracting Connor, who is a teen, but his picture shows him as a toddler. The thumbnail picture is from the last time you changed their appearance or if you never changed their appearance, it will show their toddler picture. They will be their correct/ current age when you extract them.
Once you find the sim you want to extract, click on their picture. On the right side of the window there will be two blank squares, one under "Patient Sim" and one under "Archetype Sim." Under the top box (under "Patient Sim") click on "Use." Once you do so, your sim's picture will show up in the "Patient Sim" box. Next click on "Export" next to "Patient Sim."
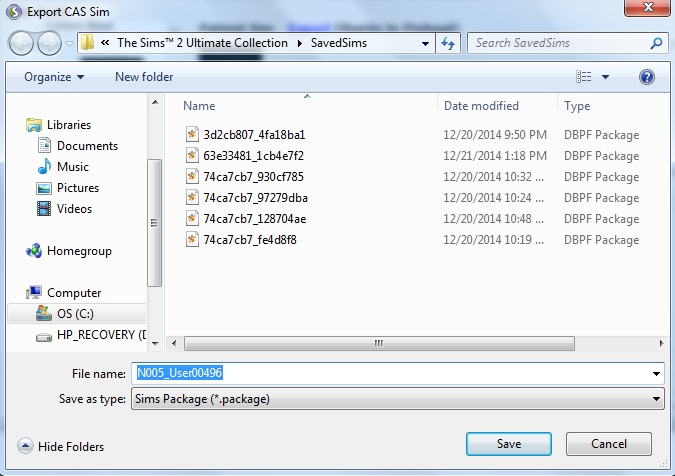
A save window will come up, asking you where you want to save your sim's data file and what you want to call it. I recommend changing the default file name (like it's shown below) to something more descriptive, like your sim's name and I would recommend saving it to either the "Saved Sims" folder (which was the default location, as you can see below) or somewhere in your "Downloads" folder, depending on how you have your downloads organized. If it's in one of those two main folders, your sim will now show up as an option in CAS in your game and in Body shop.
If you're just extracting the sim for your own personal use or if you only want to share your sim's facial structure that's all you have to do. If you want to share your sim along with any custom content they use (such as clothing and genetics) you have to use Body Shop. If you just share the file as it is now, whoever you share it with will get a sim with the same face, but default eyes, hair, and skintone.
To make sure your sim has the correct genetics and custom content attached, once you've saved their file to "Saved Sims" or "Downloads," open up Body Shop.
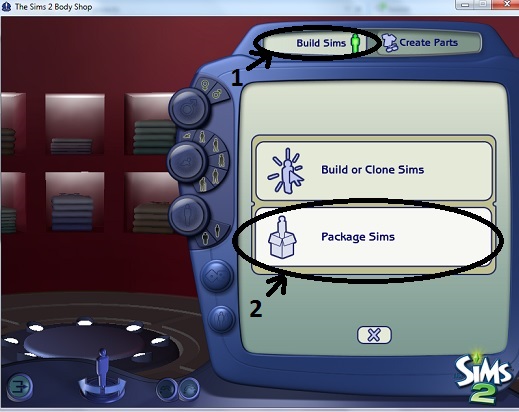
[ETA a step I forgot] You will have to save your sim in Body Shop to have the custom content attached in their package file. So when Body Shop loads, click on "Build Sims" at the top and then "Build or Clone Sims" when the option appears in the box below. On the right all of the sims you have available in CAS will show up. Scroll across until you find the sim you just extracted, click on them and then on "Clone Selected Sim" (the icon at the bottom right that looks like a pair of sims with a check mark over them. The words pop up when you hover over the icon.) I take this opportunity to make sure my sim isn't using any default replacements and to do any last minute tweaking. When you're done with any checking or changing, or right away if you're sure your sim is fine, click on the check mark below to save your sim. Then click on the "X" at the bottom to get back to the option for "Build or Clone Sims" or "Package Sims."
This time choose "Package Sims."
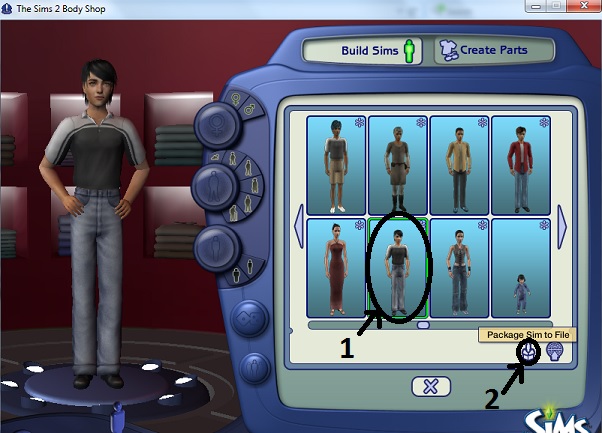
Choose the sim you just cloned and edited. (It should be the first one on the list this time.) Click on the sim, then at the bottom right click on the picture that looks like a sim in a box. (When you hover over the icon it will say "Package Sim to File.")
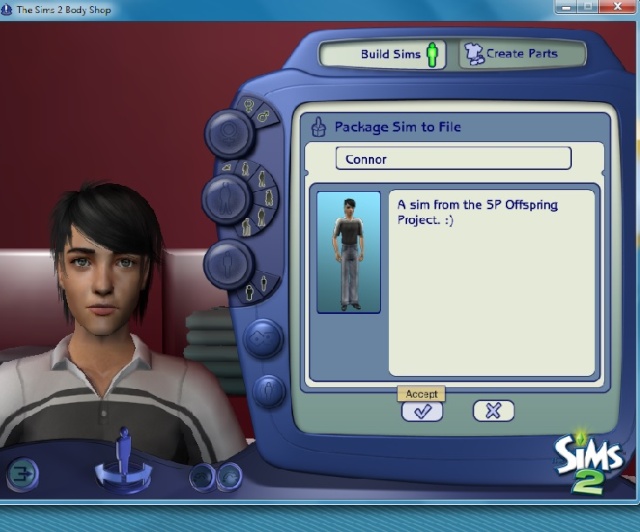
Next, on the right it will ask you to give a name and description to your packaged sim file. (You can put whatever you want here, but you have to type in something.) Click on the check mark below and a dialogue will come up telling you your sim was saved.
Your packaged sim will save to your desktop. From there you can zip it up, upload it to a file host, e-mail it to a friend, or move it somewhere else on your computer for storage. Your sim is fully extracted, saved, and ready to share!
*(Forgive my editing on these photos. I had to use paint, because I haven't installed my usual graphics program on this computer yet.

)*

 Sugah's Place is proud to be one of the last remaining Sims sites devoted entirely to Sims 2. The Ladies of SP welcome you and thank you for being here with us. * See what's NEW by clicking on THIS LINK ...We try to update regularly, so check back often! Follow us on Facebook, Pinterest and 'Tweet' yourself to a little Sugah!! ... Stop by, introduce yourself, play some forum games and schmooze a bit. We're happy to have you.


 Fri May 08, 2015 1:05 pm